UPI Collect Request: How It Works and Why You Should Use It
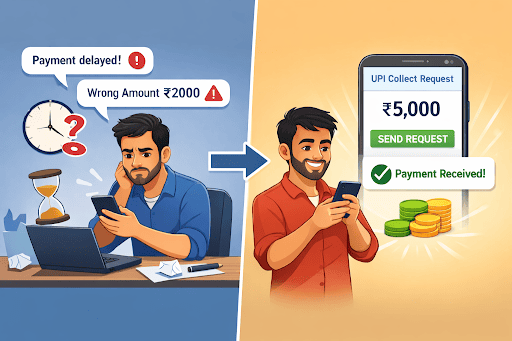
Rahul wrapped up a freelance project and expected a quick payment. He shared his UPI ID, waited, and then sent a reminder. The client replied late, entered the wrong amount once, and fixed it after another message. The whole exchange took longer than expected.
Next time, Rahul chose a different approach. He sent a collect request instead of waiting. The client received a prompt, checked the details, approved it, and completed the payment in seconds. This blog walks you through how UPI collects requests and how you can use them with confidence.
Understanding UPI Collect Request
UPI connects bank accounts and allows people to move money instantly through mobile apps. It removes the need for long account details and keeps transactions simple for everyday use.
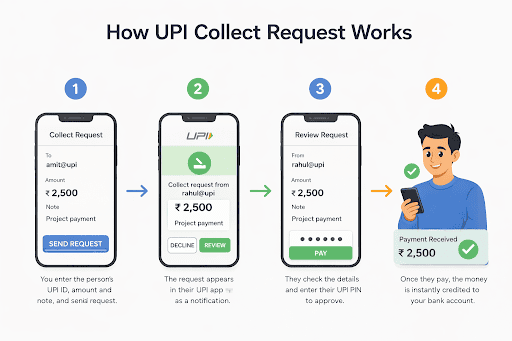
A UPI collect request changes the direction of payment. Instead of sending money, you ask someone to pay you. The request appears in the payer’s app, where they review the amount and confirm it using their PIN. This flow works well for both personal transfers and business payments because it reduces confusion and clearly records every transaction.
What is UPI Collect and How Does It Work
UPI Collect gives you a cleaner way to ask for money, without having to chase someone over calls or messages. You send a request, the other person sees it on their phone, checks the details, and decides when to approve it. This keeps control with the payer and removes all the back-and-forth.
Step 1: Open your UPI app and unlock it using the PIN
Step 2: Look for the option labeled "request or collect money" and tap it
Step 3: Enter the UPI ID of the person who needs to pay you, and take a second to make sure it looks right
Step 4: Add the amount you expect, then pause to recheck it before moving ahead
Step 5: Write a short note to help the other person understand why you are asking for payment
Step 6: Send the request and allow the payer time to open it and review the details
The moment they approve it on their app, the money moves straight into your account without any extra steps.
Also Read: What is UPI and How Does UPI Work?
How to Send a UPI Collect Request Using Different Apps?
Almost all UPI apps work in a similar manner. You learn once, and then you can switch between apps and use them without any stress. A few small checks at each step help you avoid delays or errors.
Step 1: Open your UPI app and head to the section where you can request money.
Step 2: Type the UPI ID of the person who needs to pay you, and check it once to ensure it goes to the right account.
Step 3: Enter the amount and pause to confirm it is correct
Step 4: Add a note to provide context for the request
Step 5: Send the request and wait for the payer to act on the notification
Once they open it and approve the request, the funds are deposited in your account almost instantly, with no extra effort on your part.
Benefits of Using UPI Collect for Businesses and Individuals
UPI collects requests, bringing clarity to payments and reducing the need for constant follow-ups.
- It allows you to request payments directly instead of waiting for someone to initiate them
- Keeps transactions secure with PIN-based approval and encrypted systems
- Transfers funds instantly once the payer confirms the request
- Removes dependence on cash and paper records
- Supports freelancers, service providers, and small businesses that depend on timely payments
- Improves payment discipline and reduces unnecessary delays
How to Collect Money Using UPI?
Collecting money through UPI feels easier when you follow a clear flow and stay attentive to small details. Each step ensures that the request reaches the right person and gets approved without confusion.
Step 1: Open your UPI app and access the request money option from the main screen.
Step 2: Enter the payer’s UPI ID and confirm it is correct.
Step 3: Add the amount you expect to receive and take a quick look to confirm it.
Step 4: Write a short note to help the payer understand the purpose of the payment.
Step 5: Send the request and wait for the payer to open it and take action.
Once the payer approves the request, the amount reflects in your account within seconds.
Making Payments Feel Certain and Timely
UPI collects requests, removes the guesswork from receiving money, and gives you better control over every transaction. You no longer need reminders because the request itself prompts the payer to take action.
With support from Hero FinCorp, you can manage your finances with more clarity. You can also explore a personal loan app to track repayments or apply here when you need quick access to funds. A smoother payment flow helps you focus on what matters instead of chasing payments.
Frequently Asked Questions
What is a UPI Collect request?
A UPI collect request lets you ask another user to send money. The payer receives a notification and approves the payment through their UPI app.
Are there charges for UPI Collect?
Most platforms do not charge users for collect requests, although some services may apply small fees depending on usage.
How long does payment take?
The system completes the transaction within seconds once the payer approves the request.
Can I cancel a UPI Collect request?
You can cancel a pending request before approval through your app, depending on the features it provides.
Disclaimer: The information provided in this blog post is intended for informational purposes only. The content is based on research and opinions available at the time of writing. While we strive to ensure accuracy, we do not claim to be exhaustive or definitive. Readers are advised to independently verify any details mentioned here, such as specifications, features, and availability, before making any decisions. Hero FinCorp does not take responsibility for any discrepancies, inaccuracies, or changes that may occur after the publication of this blog. The choice to rely on the information presented herein is at the reader's discretion, and we recommend consulting official sources and experts for the most up-to-date and accurate information about the featured products.